Javafx Delete Text From Label and Set It Again
| Jakob Jenkov |
A JavaFX Button command enables a JavaFX application to take some activeness executed when the application user clicks the push. The JavaFX Button control is represented by the class javafx.scene.control.Button . A JavaFX Button can have a text and an icon on it which bespeak to the user what clicking the button will exercise.
Creating a Button
You create a push button control by creating an instance of the Push class. Hither is a JavaFX Push button instantiation example:
Button button = new Button("My Label"); The text to be displayed on the button is passed as parameters to the Button constructor.
Adding a Button to the Scene Graph
For a JavaFX Button to be visible the button object must be added to the scene graph. This means adding it to a Scene object, or as child of a layout which is attached to a Scene object.
Here is an example that attaches a JavaFX Button to the scene graph:
package com.jenkov.javafx.controls; import javafx.awarding.Application; import javafx.scene.Scene; import javafx.scene.command.Push; import javafx.scene.control.Label; import javafx.phase.Stage; public course ButtonExperiments extends Awarding { @Override public void first(Stage primaryStage) throws Exception { primaryStage.setTitle("HBox Experiment i"); Button push button = new Button("My Button"); Scene scene = new Scene(button, 200, 100); primaryStage.setScene(scene); primaryStage.show(); } public static void chief(Cord[] args) { Awarding.launch(args); } } Observe that the Push is added direct to the Scene object. Normally you lot would nest the Push button inside a layout component of some kind. I accept left that out here to go along the example simple. See the tutorials near layout components to meet how they work.
The result of running the above JavaFX Button example is an application that looks like this:
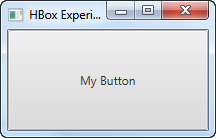
Notice that the push takes upward all the space bachelor in the window. That is why it is difficult to see the edges of the button. When a JavaFX button is added to a layout component y'all tin can more easily see the edges of the button.
Button Text
At that place are two ways to gear up the text of a JavaFX push button. The first manner is to laissez passer the text to the Button constructor. You have already seen this in earlier examples.
The 2nd way to set the push text is by calling the setText() method on the Push instance. This tin can be done after the Button case is created. Thus it tin be used to modify the text of a Button that is already visible. Here is an case how how calling setText() on a JavaFX Push button looks:
push button.setText("Click me if you dare!"); Button Text Size
Yous can ready the text size of a JavaFX Button. You practice and so using the CSS belongings -fx-text-size. This CSS property is explained in the section near Button CSS Styling
Button Text Wrap
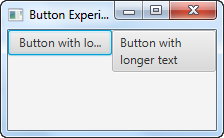
The JavaFX Button control supports text wrapping of the button text. By text wrapping is meant that if the text is too long to be displayed on a single line inside the button, the text is broken onto multiple lines.
You enable text wrapping on a JavaFX Button case using the method setWrapText(). The setWrapText() method takes a single boolean parameter. If you pass a value of true to setWrapText() then you lot enable text wrapping. If you laissez passer a value of simulated to setWrapText() and so you disable text wrapping. Here is an example that enables text wrapping on a JavaFX push:
push.setWrapText(true);
Here is a screenshot of ii JavaFX buttons ane of which has text wrapping enabled:
Button Font
You lot tin specify what font the text on a JavaFX Button should be rendered with via its setFont() method. You tin read more nigh creating fonts in my JavaFX Fonts tutorial. Here is an example of setting a font on a JavaFX Button:
Push button button = new Push button("Click me!"); Font font = Font.font("Courier New", FontWeight.BOLD, 36); button.setFont(font); Default Button Style
A JavaFX Push can exist fix into a default mode. When a Button is in default manner it is rendered differently, so the user can see that this is the default button. On Windows, the Button's background color changes, although I estimate that also depends on the colour theme used in the application etc. and may change in future versions of JavaFX.
The default button is intended to exist used for the "default choice" in a dialog or grade. Thus, information technology becomes easier for the user to select the choice that the user is most likely making most oft.
The default button of a dialog or grade has some additional keyboard shortcuts to help the user click it:
- Windows + Linux
- If no other push button has focus, pressing the ENTER keyboard key will activate the default push.
- If the default button has focus, pressing the ENTER keyboard key will activate the default push button.
- Mac
- But the default button can be activated by pressing the ENTER keyboard key. All other buttons are activated by pressing the the Space keyboard key.
Setting a JavaFX Button as the default button is washed via its setDefaultButton() method. Hither is an example of setting a JavaFX push button as default button:
push button.setDefaultButton(true);
Cancel Push Mode
A JavaFX Button tin be set into abolish mode. When a Button is in cancel mode it can be activated more easily by pressing the ESC keyboard key - if no other node in the Scene graph consumes this central press.
Setting a JavaFX Button in cancel mode (as abolish push button) is done via its setCancelButton() method. Here is an case of setting a JavaFX Push in cancel way:
buttonDefault.setCancelButton(true);
Push button Image
It is possible to display an image inside a button next to the push text. The JavaFX Button class contains a constructor that tin can take a Node as extra parameter. Here is a JavaFX label instance that adds an paradigm to the button using an JavaFX ImageView component:
package com.jenkov.javafx.controls; import javafx.awarding.Application; import javafx.scene.Scene; import javafx.scene.command.Button; import javafx.scene.image.Prototype; import javafx.scene.image.ImageView; import javafx.stage.Stage; import java.io.FileInputStream; public class ButtonExperiments extends Awarding { @Override public void kickoff(Stage primaryStage) throws Exception { primaryStage.setTitle("HBox Experiment one"); FileInputStream input = new FileInputStream("resource/images/iconmonstr-home-6-48.png"); Image image = new Epitome(input); ImageView imageView = new ImageView(image); Button button = new Button("Home", imageView); Scene scene = new Scene(button, 200, 100); primaryStage.setScene(scene); primaryStage.evidence(); } public static void main(String[] args) { Application.launch(args); } } The result of running the above JavaFX Push button example is an application that looks like this:

Button Size
The JavaFX Button class contains a set of methods y'all can use to set the button size. The methods decision-making the button size are:
button.setMinWidth() button.setMaxWidth() button.setPrefWidth() button.setMinHeight() button.setMaxHeight() button.setPrefHeight() button.setMinSize() button.setMaxSize() button.setPrefSize()
The methods setMinWidth() and setMaxWidth() sets the minimum and maximum width the button should be immune to have. The method setPrefWidth() sets the preferred width of the button. When there is space plenty to brandish a button in its preferred width, JavaFX will do so. If non, JavaFX volition calibration the button down until information technology reaches its minimum width.
The methods setMinHeight() and setMaxHeight() sets the minimum and maximum height the button should be allowed to have. The method setPrefHeight() sets the preferred elevation of the button. When there is space plenty to display a push button in its preferred acme, JavaFX will practise and then. If not, JavaFX will scale the button downward until it reaches its minimum pinnacle.
The methods setMinSize(), setMaxSize() and setPrefSize() sets both width and height for the button in a unmarried telephone call. Thus, these methods takes both a width and a meridian parameter. For instance, calling
button.setMaxSize(100, 200);
is equivalent to calling
push button.setMaxWidth(100); button.setMaxHeight(200);
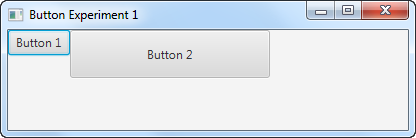
Here is a screenshot of ii JavaFX buttons. The first button has the default size calculated from its button text and the layout component it is nested inside. The 2d push has a preferred width of 200 and height of 48 assail it:
Push Events
In club to reply to the click of a button you need to attach an event listener to the Push object. Hither is how that looks:
button.setOnAction(new EventHandler() { @Override public void handle(ActionEvent actionEvent) { //... practise something in here. } });
Here is how attaching a click event listener looks with a Java Lambda expression:
button.setOnAction(actionEvent -> { //... do something in hither. }); Finally, let us meet a full example that changes the text of a JavaFX Characterization when the button is clicked:
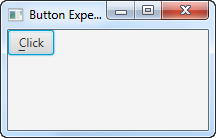
package com.jenkov.javafx.controls; import javafx.application.Application; import javafx.event.ActionEvent; import javafx.event.EventHandler; import javafx.scene.Scene; import javafx.scene.command.Push button; import javafx.scene.control.Label; import javafx.scene.layout.HBox; import javafx.phase.Stage; public form ButtonExperiments extends Awarding { @Override public void outset(Stage primaryStage) throws Exception { primaryStage.setTitle("HBox Experiment 1"); Label characterization = new Label("Not clicked"); Button push = new Button("Click"); push button.setOnAction(value -> { characterization.setText("Clicked!"); }); HBox hbox = new HBox(push button, label); Scene scene = new Scene(hbox, 200, 100); primaryStage.setScene(scene); primaryStage.show(); } public static void main(String[] args) { Application.launch(args); } } Push Mnemonic
You can fix a mnemonic on a JavaFX Button instance. A mnemonic is a keyboard key which activates the button when pressed in conjunction with the ALT key. Thus, a mnemonic is a keyboard shortcut to activating the push button. I will explain how to actuate a push button via its mnemonic later.
The mnemonic for a button is specified inside the button text. You mark which central is to be used as mnemonic by placing an underscore character (_) in front of the grapheme in the push text you want to set every bit mnemonic for that button. The underscore character will not be displayed in the button text. Hither is an example setting a mnemonic for a button:
button.setMnemonicParsing(truthful); button.setText("_Click"); Observe that it is necessary to first call setMnemonicParsing() on the button with a value of true. This instructs the push to parse mnemonics in the push button text. If you phone call this method with a value of fake instead, the underscore character in the button text will merely show up every bit text, and will not be interpreted as a mnemonic.
The second line sets the text _Click on the push button. This tells the push button to apply the primal c as mnemonic. Mnemonics are example insensitive, so it does not accept to be an a uppercase C that activates the push button.
To activate the push you can now press ALT-C (both at the same time). That will actuate the button just equally if you had clicked information technology with the mouse.
You can besides first printing the ALT key once. That will bear witness the mnemonic of the button in the button text. You can then press the c key. If you lot printing ALT and then ALT once more, the mnemonic is first shown, and so subconscious once again. When the mnemonic is visible you can activate the button with the mnemonic key alone, without ALT pressed at the aforementioned time. When the mnemonic is not visible you accept to printing both ALT and the mnemonic fundamental at the same time to activate the button.
Hither are two screenshots showing what it looks like when the mnemonic is invisible and visible:

Button CSS Styles
You can way a JavaFX button using CSS styles. The JavaFX Push button control supports the post-obit CSS styles:
-fx-border-width -fx-border-colour -fx-groundwork-colour -fx-font-size -fx-text-fill
Hither is an instance setting the background colour of a JavaFX push button to reddish:
Button button = new Push button("My Button"); button.setStyle("-fx-background-color: #ff0000; "); This example sets the style directly on the push button via the setStyle() method, merely you can besides style a JavaFX button via way sheets. See my JavaFX CSS Styling tutorial for more information most using CSS stylesheets with JavaFX.
Here is a JavaFX push example which creates 4 different buttons. Each button has a CSS style set on them. After the code example I have included a screenshot of how the buttons look with the given styling.
package com.jenkov.javafx.controls; import javafx.application.Application; import javafx.scene.Scene; import javafx.scene.command.Button; import javafx.scene.layout.HBox; import javafx.stage.Stage; import java.io.FileInputStream; import coffee.io.FileNotFoundException; public grade ButtonExperiments extends Application { @Override public void showtime(Phase primaryStage) throws Exception { primaryStage.setTitle("Button Experiment 1"); Button button1 = new Button("Button ane"); Push button2 = new Button("Button 2"); Push button button3 = new Button("Button 3"); Button button4 = new Push("Push button four"); button1.setStyle("-fx-border-colour: #ff0000; -fx-border-width: 5px;"); button2.setStyle("-fx-background-color: #00ff00"); button3.setStyle("-fx-font-size: 2em; "); button4.setStyle("-fx-text-fill: #0000ff"); HBox hbox = new HBox(button1, button2, button3, button4); Scene scene = new Scene(hbox, 400, 100); primaryStage.setScene(scene); primaryStage.show(); } public static void main(String[] args) { Application.launch(args); } } Here is a screenshot of the 4 JavaFX buttons with their CSS styling:
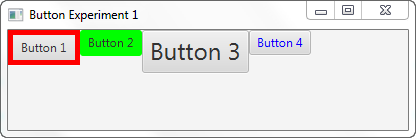
The first push has both the -fx-border-width and -fx-border-color CSS properties set. This results in a 5 pixel wide ruby-red border for the button.
The second button has the -fx-groundwork-color CSS property set. This results in a light-green background color for the button.
The tertiary button has the -fx-font-size CSS property fix. This results in a button with a text that is ii times as big as normal.
The 4th push has the -fx-text-fill up CSS property prepare. This results in a button with a blue text color.
You can combine the CSS styles for a JavaFX button simply by setting multiple CSS properties on information technology, similar the get-go button in the example above has.
Disable Button
Yous tin disable a JavaFX Button via its setDisable() method. The setDisable() method takes a boolean parameter which specify if the button should be disabled or not. A value of truthful means the button will exist disabled, and a value of false means information technology volition not be disabled - which means enabled. Hither is an instance of disabling a JavaFX Button via its setDisable() method:
Push button button = new Button(); button.setText("Click me!"); // here the app is running, and something happens then // the button should now exist disabled. button.setDisable(truthful); // again the app runs, and something happens so // the push button should now be enabled once more. push button.setDisable(false); Button FXML
It is possible to declare a JavaFX Push button inside a JavaFX FXML file. I will not explain FXML in every detail here. Click on the link in the first sentence to read more than almost how FXML works. I will just show you the parts of FXML related to the JavaFX Push button command. Here is a very uncomplicated FXML file example that shows how to declare a Button:
<?xml version="1.0" encoding="UTF-8"?> <?import javafx.scene.layout.VBox?> <?import javafx.scene.control.Button?> <VBox xmlns:fx="http://javafx.com/fxml" spacing="twenty"> <children> <Button fx:id="button1" text="Click me!" onAction="#buttonClicked"/> </children> </VBox>
It is the <Button> element that declares the Button control. The fx:id aspect can exist used to wire up the declared Push button to a Button fellow member variable inside an FXML Controller object.
The text attribute is used to set the respective text property value in the Push button instance created for this Button annunciation. That is the text displayed on the push button.
The onAction attribute is used to link the Push button's onAction event to a method in the FXML controller object. In this instance it is the method named buttonClicked() in the FXML controller.
Here is how the respective FXML controller object'due south class looks. Notice the proper noun of the button1 Button member variable matches the fx:id attribute value in the FXML file. This fellow member variable must be public, by the style. Find also the method buttonClicked() which is referenced from the Button onAction attribute in the FXML file.
import javafx.issue.Issue; import javafx.fxml.FXML; import javafx.scene.control.Button; public class ButtonFXMLController { public Push button button1 = null; private int button1ClickCount = 0; @FXML public void buttonClicked(Event e){ this.button1ClickCount++; Cord text = "Button1 clicked " + this.button1ClickCount + " times"; System.out.println(text); button1.setText(text); } } And here is the full JavaFX app that loads the FXML file and creates the FXML controller etc. :
import javafx.awarding.Awarding; import javafx.fxml.FXMLLoader; import javafx.scene.Scene; import javafx.scene.layout.VBox; import javafx.phase.Phase; import java.io.File; import java.net.URL; public grade ButtonFXMLExample extends Application { public static void main(String[] args) { launch(args); } @Override public void start(Stage primaryStage) throws Exception { FXMLLoader loader = new FXMLLoader(); ButtonFXMLController controller = new ButtonFXMLController(); loader.setController(controller); File fxmlFile = new File("assets/fxml/button-instance.fxml"); URL fxmlUrl = fxmlFile.toURI().toURL(); loader.setLocation(fxmlUrl); VBox vbox = loader.<VBox>load(); Scene scene = new Scene(vbox); primaryStage.setScene(scene); primaryStage.setTitle("Button FXML Example"); primaryStage.setWidth(300); primaryStage.setHeight(300); primaryStage.show(); } } Push button Transformations
Yous can add together JavaFX transformations to a JavaFX Push button such every bit scaling, rotation, translation etc. Y'all add transformation objects to a JavaFX Button similar this:
button.getTransforms().add(scaleTransformation);
Here is a total example of adding a Scale transformation to a JavaFX Button:
import javafx.application.Application; import javafx.scene.Scene; import javafx.scene.command.Push; import javafx.scene.layout.VBox; import javafx.scene.transform.Scale; import javafx.stage.Stage; public grade ButtonTransformationExample extends Application { public static void main(Cord[] args) { launch(args); } @Override public void start(Stage primaryStage) { Push button push = new Button(); button.setText("Click me!"); push button.setOnAction((upshot) -> { Organisation.out.println("Button clicked!"); }); Calibration scaleTransformation = new Scale(); scaleTransformation.setX(three.0); scaleTransformation.setY(2.0); scaleTransformation.setPivotX(0); scaleTransformation.setPivotY(0); button.getTransforms().add(scaleTransformation); VBox vbox = new VBox(button); Scene scene = new Scene(vbox); primaryStage.setScene(scene); primaryStage.setWidth(512); primaryStage.setHeight(256); primaryStage.show(); } } Source: http://tutorials.jenkov.com/javafx/button.html
0 Response to "Javafx Delete Text From Label and Set It Again"
Post a Comment